Here is my hand at DIY baby food! My husband and I are trying to be "better" for our son and one of the areas we are desperately trying to change is our food. We have always agreed that we would like to make our own baby food so we could monitor what went in his body. I am very big on breastfeeding and not wanting artifical items going into his body so making organic baby food just seemed right.
We have already tried a few foods before today but they have fallen kind of flat with our little man. We tried avocado first, followed by green beans, bananas and peas. We did try a mix of avocado and banana together and he seemed to like the mixture better then any of the others plain. We are in no way pushing our child to eat solids but just offering them to him after a nice full belly of breastmilk. We tried giving the items a little more solid but he wasn't having it. It seems for Oliver the runnier the better at the moment.
We have several busy weekends coming up and our week nights aren't conducive to making food on a regular basis so I have decided to make a bunch and freeze. I had been doing a lot of research on baby food and found a couple of great sites I am pretty much relying on to get me through the puree stage. Wholesome Baby Foods, Sweet Peas & Pumpkins and Styleberry Blog. They are all great but Wholesome Baby Foods is my all time favorite!
The hubs and I made a trip to our local organic food market since we aren't quite in season for the farmer's market yet. It was a great time. I picked out our food and Scott tried to weigh Oliver on the food scale. He's sitting above 16 lbs! haha
We picked up the following:
.5 lbs of peas
2 lbs of green beans
A bunch of bananas
2 lbs of plums
2 mangos
4 avocados
5 apples
2 bunches of carrots
3 sweet potatoes
1 acorn squash
Sunday, April 15, 2012
Saturday, April 14, 2012
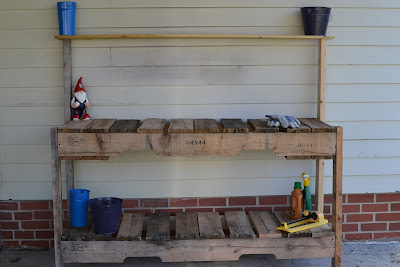
DIY Pallet Potting Bench
I have found pallet love! At work we had 2 very large, heavy duty, pallets that we weren't sure what to do with. I saw this on Pinterest and decided I would try and make it. I ended up using only one pallet and some 2x4s.
We could have gone one of 2 ways with this project. The easier and more rugged way or the harder but much more pretty way. We chose easy and rugged! The harder way would require us to remove every piece from the pallet and then design from there. The easier way involved keeping the pallet as intact as possible and just adding some 2x4s to make the bottom shelf. We needed to split the pallet in half to make a top and bottom shelf. We used the sawzall and cut it down the center.


We could have gone one of 2 ways with this project. The easier and more rugged way or the harder but much more pretty way. We chose easy and rugged! The harder way would require us to remove every piece from the pallet and then design from there. The easier way involved keeping the pallet as intact as possible and just adding some 2x4s to make the bottom shelf. We needed to split the pallet in half to make a top and bottom shelf. We used the sawzall and cut it down the center.


Once we got the top cut, we flipped it over and cut the bottom side.


We did not want to have the 4 pieces on the bottom shelf so we removed those. This worked out very well as we used the 4 pieces we removed to fill in holes on the top side of both shelves.
Once we removed them we nailed them to the top.


We added 2x4s to the ends to help with strength. On the bottom shelf we also needed to add a 2x4 the length of the shelf since there are only 3 boards that run through the middle of the pallet.


Then we attached the legs! We wanted our table to be 36" high so we cut the front to legs to that height.

After the front legs were added we added the back legs. We chose a height of 50 some inches for the back to legs so we could add a small top shelf. We then screwed in the bottom shelf. We used an extra pallet to raise the bottoms shelf off the ground so we could screw it in place.


We then added our top shelf and we were done!


Friday, April 13, 2012
Breastfeeding Rocks!
I was given the chance a couple weekends ago to participate in a photo shoot to help promote nursing in public. I was very nervous at first but thought what the heck and went for it. I am so glad I did. The pictures were taken by an amazing photographer! Her name is Destri of D&orfs Photography. She photographed several moms, I think 5 in the Des Moines area and 6 in the Ames area. The pictures are going to be used in a calendar and also in media material to help promote nursing in public! Here are some shots from the shoot! Did I mention they were amazing? :)


I will add more later when I have a chance!
Wednesday, April 4, 2012
Blog Gets a New Look!
So I have been terrible at keeping up with this. I wanted to use this as a way to come back and remember all of the small moments in Oliver's life but here I am, 6 months in, and have nothing. I am vowing to myself I will at least write one post a week if not more.
I have also changed the name. I could never find a name that I liked and fit where I wanted to go with this blog. On a trip to Iowa City I started thinking about Green Olives and Olive Green the color. So I went with Green Olive with the hanging R! A lot of things I will be talking about with Oliver and in our life are ways we are going green and becoming more "crunchy"!! :) So here is post 1 and his 6 months post is coming soon!
I have also changed the name. I could never find a name that I liked and fit where I wanted to go with this blog. On a trip to Iowa City I started thinking about Green Olives and Olive Green the color. So I went with Green Olive with the hanging R! A lot of things I will be talking about with Oliver and in our life are ways we are going green and becoming more "crunchy"!! :) So here is post 1 and his 6 months post is coming soon!
Subscribe to:
Posts (Atom)